Drills are indispensable tools for various tasks, from intricate crafts to heavy-duty projects. Whether you’re a seasoned DIY enthusiast or a homeowner with occasional needs, understanding how to use a drill properly is essential. Here’s a guide to mastering the drill:
Buying a Drill:
- Corded vs. Cordless: Decide between corded drills for consistent power or cordless drills for mobility. Cordless drills offer convenience but may require battery replacements.
- Considerations: Match the drill to your needs. Light tasks like shelf installation suit lightweight cordless drills (4V, 8V, 12V, or 18V). Mid-range projects like drywall hanging benefit from an 18-volt cordless drill. For heavy-duty work or constant use, opt for a 20-volt cordless or corded drill.
Basic Drill Features:
- Chuck: Front clamp holding drill bits or drivers securely.
- Clutch: Adjusts torque and speed, located behind the chuck.
- Trigger: Controls variable speed and powers the drill on/off.
- Forward/Reverse: Switches between clockwise (forward) and counterclockwise (reverse) rotation.
- Power Source: Cordless drills feature lithium-ion batteries, while corded models rely on electric power cords.
Optional Drill Features:
- Built-in Light: LED light near the chuck or trigger for illuminating the work area.
- Driver Bit Holder: Magnetic or clip-on holder for storing spare driver bits.
- Brushless Motor: Offers quieter operation and a more compact design.
- Side Handle: Detachable handle for a safer, firmer grip, especially useful for heavy-duty tasks.
Mastering the Drill:
- Safety First: Always wear appropriate safety gear, including eye protection and gloves.
- Choose the Right Bit: Select the correct drill bit or driver for your task and material.
- Secure Workpiece: Clamp or hold the workpiece securely to prevent movement while drilling.
- Start Slowly: Begin drilling at a low speed to ensure accuracy and control.
- Apply Even Pressure: Maintain consistent pressure on the drill while drilling to prevent slipping or jamming.
- Control Depth: Use depth guides or markings on the drill to ensure the correct drilling depth.
- Practice Control: Practice drilling on scrap material to refine your technique before tackling your project.
By understanding the features and techniques of using a drill effectively, you can tackle a wide range of projects with confidence and precision.
Types of Drill Bits and Drivers:
For driving screws, select driver bits matching the screw head shape (Phillips, flat-head, etc.). Additional bits for different screw brands like Torx and Spax are available. Drill bits are labeled with numbers indicating their diameter, typically ranging from 1/16-inch to 1/2-inch. For larger holes up to 1-1/2 inches, use flat, shield-shaped spade bits. Choose drill bits tailored to the material being drilled, such as glass drill bits for non-tempered and ceramic glass.
Safety Considerations:
Always wear eye and hearing protection when operating a drill. To avoid strain or injury to hands or wrists, use drills with built-in or attachable side handles for better grip. When lacking a side handle, ensure a secure grip with both hands on the drill’s pistol grip.
How to Use a Drill:
- Select the Drill Bit or Driver:
- For pilot holes, choose a drill bit matching the screw shank diameter.
- For driving screws, select a driver bit matching the screw head shape.
- Adjust the Drill’s Clutch:
- Set the clutch to low speed and high torque (setting 1) for driving screws.
- Opt for high speed and low torque (setting 2) for drilling holes.
- Chuck in the Driver or Drill Bit:
- Loosen the chuck by turning it counter-clockwise.
- Insert the driver or drill bit, then tighten the chuck by turning clockwise.
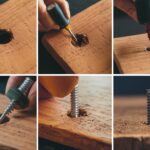
- Drill a Pilot Hole (Optional):
- For screws in prone-to-cracking woods, create a pilot hole slightly smaller than the screw diameter.
- Place the Driver or Drill Bit:
- Position the drill bit or driver on the drilling spot or screw head.
- Drill the Hole or Drive the Fastener:
- Gently pull the trigger to start drilling or driving, adjusting speed as needed.
- Press on the Drill:
- Apply gentle pressure on the drill to guide it through the material.
- Remove the Drill Bit or Driver:
- For drill bits, pull outward while rotating or use reverse mode if stuck.
- For drivers, stop driving before removing from the fastener.
Tips and Tricks for Using a Drill:
- Utilize torque settings for efficient screw driving or hole drilling.
- Use sharp drill bits for cleaner, safer drilling.
- When drilling metal, create a starting point with an awl and hammer.
- For drills with a key-chuck system, use the key to tighten the chuck securely.
FAQ:
- How do you attach a drill bit?: Open the chuck, insert the bit, and tighten manually.
- What kind of drill is good for beginners?: An 18V or 20V cordless rechargeable lithium-ion drill is recommended.
- Is it worth owning a drill?: Yes, drills are versatile tools useful for various projects, from DIY tasks to light projects like shelf installation.


